Showing posts with label Recipe. Show all posts
Monday, June 17, 2013
Happy Hour at Home (guacamole recipe)
Chris and I rarely made it out to happy hour before we had Henry and now it never happens. Yesterday, we did our own "happy hour at home" with some fresh guacamole and some Summer Shandy....so refreshing!
Guacamole Recipe:
4 Avocados (I used organic Haas), removed from the peal and smashed
1/2 lime, juice and zest
1 teaspoon cilantro, fresh and chopped
1 tablespoon salsa
1/4 teaspoon seasoning salt
Smash avocados in a bowl, add remaining ingredients and stir. Serve with chips, veggie slices or on top of burgers or chicken. Store left-over guac in the fridge. I press plastic wrap right on the surface of the guac to keep it from turning brown.
Sunday, June 9, 2013
Asian Coleslaw (Ramen Noodle Salad)
When I'm looking for a quick, summery side dish I always think of this salad. We love the crunchy texture and the flavor combo! I can (and do) eat it right out of the serving bowl if I'm really hungry. I recently had a friend request the recipe so here it is:
In a large salad bowl, combine:
1 package shredded cabbage/coleslaw mix
1 package of ramen noodles, broken into small pieces (I use chicken flavored)
1/2 cup sliced almonds, toasted
1 Tablespoon toasted sesame seeds
1-2 Tablespoons green onions/chives, chopped
To make the dressing, whisk to combine:
1/2 cup vegetable oil
2 Tablespoons white vinegar
2 Tablespoons sugar
1/2 teaspoon salt
1 flavor packet from ramen noodles
Pour dressing over salad and toss to incorporate. Salad will wilt down after 1/2 hour or so. I try to make it an hour or two ahead of time to allow time for the flavors to meld but not too far in advance because the ramen will soften. Enjoy!
What are some of your favorite summer dishes?
Friday, March 8, 2013
"Fried" chicken
Last weekend when meal planning, Chris asked for baked chicken. I wanted something a bit more interesting than just seasoning it and throwing it in oven so I came up with this recipe (or more like technique) based on some fish my mom made for us a few weeks ago. It turned out delicious despite the smoke alarm going off (setting off Lila and then the baby... It was a hot mess for a minute). Guess its time to clean my oven :)
Ingredients:
1 fryer chicken, ours was split in halves (I couldn't find quarters)
2/3 cup almond meal
Seasonings as preferred (I used 1 tsp salt, 1 tsp pepper, 1/2 tsp onion powder, 1 tsp garlic powder, a touch of cinnamon, 1 tbs paprika)
Olive oil spray
Preheat oven to 425
Line baking pan with foil and place cooling rack on top (this allows air in all sides of the chicken so it gets crispy all over)
Place all ingredients in zip top plastic bag and shake to coat chicken
Place chicken on rack and spray with olive oil
Bake 1 hour or until done
That's it :). Easy and delicious!
Note, I left the skin on for Chris but removed it on my piece before eating. I think the coating would stick to the meat if the skin was removef as well.
Monday, February 25, 2013
Quinoa Coconut Granola
While Henry was sleeping, I whipped up this granola and it was a winner! It is grain free so will be another breakfast/snack option for both Chris and I. I'm planning on topping some fruit and yogurt with this yummy mix. I usually have cooked quinoa in the fridge for fast breakfast and lunch options so it was easy to throw this together.
Preheat oven to 300.
In a large bowl, mix the following ingredients:
3 cups cooked, cooled quinoa
1 cup unsweetened coconut flakes
1/2 cup slivered almonds
1/4 coconut oil, melted
1/2 cup maple syrup
2 tablespoons ground flax
2 tablespoons chia seeds
1 teaspoon cinnamon
1 teaspoon vanilla
Spread out on a baking sheet and bake for 45 min-1 1/2 hours, depending on desired crunchiness. Stir every 20-30 minutes. Store in an air-tight container.
Monday, January 28, 2013
Trying some new recipes!
Our living room, mid-installation |
C has been busy this weekend installing Ethernet cables throughout our basement and first floor...not an easy task as the house was built in 1940's and the walls are SOLID. I've been trying to stay out of his way and luckily, his projects have kept him out of the kitchen so I've been trying some new recipes and thought I would share (and okay, this might be a little bit of nesting too):
I found a recipe to make C some "Primal Fudge" from Practical Paleo and these babies are yummy! I added a sprinkle of sea salt to each one before they set up.
Next, I made some No Bake Energy Bites from Gimme Some Oven. I found this recipe on Pinterest around the holidays and we've had them in our fridge ever since as they are a great snack or I'll grab 2 for breakfast with a fruit smoothie on days I'm on the run.
I also tried these Breakfast Cookies from Nutrition Nut on the Run except with mixed dried fruit (used what I had in the pantry-cherries, cranberries and blueberries). Next time I'll add a little more maple syrup as mine weren't very sweet...maybe the banana I used wasn't ripe enough?
For dinner, I decided to spice up our Brussels Sprouts with this Honey-Orange Vinaigrette from Peas and Thank You. We eat Brussels Sprouts regularly and we both loved this combo!
Have you tried anything new lately?
Friday, January 18, 2013
One Dish Wonder-Skillet Supper
Last week, C and I were walking the dogs and discussing what to have for dinner as I only meal planned for the beginning of the week. We decided to do something different and it turned out great! We used ingredients we had on hand to create a skillet supper filled with green peppers, frozen green beans, bacon, almonds and served with qunioa (which we had already cooked and in the fridge). The whole meal took less than 30 minutes to throw together and we both loved the flavor of it.
Ingredients:
6 strips bacon, cut into pieces
1/2 green pepper, julienned (sliced thinly)
12 oz frozen green beans
1/4 cup slivered/sliced almonds
2 cups quinoa (already cooked)
sprinkle of roasted red pepper flakes (depending on how spicy you like things)
1/4 t. garlic powder
salt and pepper to taste
Directions:
1. In a large skillet, start by cooking bacon on medium heat until crisp. Drain on paper towels and remove extra bacon grease from skillet.
2. Add pepper and green beans to skillet and season with pepper flakes, garlic, salt and pepper. Cover with lid to steam for 5-10 minutes, depending on preferred level of crispness of beans. You may need to stir periodically.
3. Add almonds, bacon and quinoa to skillet and saute until almonds are toasted.
4. Serve and enjoy!
Wednesday, January 2, 2013
Homemade Bread Recipe
I've been meaning to post this recipe for a while, it's now our go-to bread recipe that I use almost every week. I usually have some dough in the fridge that can easily be made into a quick artisan loaf, pizza dough or naan depending on what we are having for dinner. One our my (our) goals for 2012 was to bake our own bread so after successfully using the recipe for almost a year, I think it's time to share!
The technique for the recipe and my inspiration came from the book "Artisan Bread in 5 Minutes a Day". You can find a link here to the basic technique/original recipe. I highly recommend reading the original technique before jumping in! If you are expecting a loaf of bread, this is not it but it is a delicious
1 1/2 cups warm water
3/4 T granulated yeast
3/4 T sea salt
1/2 cups spelt flour (if don't have spelt, just use whole wheat)
1 cup whole wheat flour
1 1/2 cups white flour
Cornmeal mixed with onion and garlic powder for shaping dough and pan
Mixing the Dough:
Add water, yeast and salt in 5 qt. mixing bowl and mix (I use my KitchenAid stand mixer with the regular flat paddle attachment)
Add in flour, 1/2 cup at a time until all combined
Cover loosely (NEVER put in airtight container-the gasses could cause an explosion). Leave at room temperature for 2 hours or until dough rises and top flattens.
Leave loosely covered (I use an inverted plate) and refrigerate. Dough is good up to 2 weeks.
To bake bread:
Preheat oven to 425F. Place a broiler tray or pan full of water on bottom rack of oven.
Take out desired size ball of dough, use cornmeal mix to shape into a ball and continue to form ball by tucking under ends of dough. Place dough on cornmeal coated baking surface (I use a baking stone or sheet pan with a SilPat mat).
Let rise 20 minutes and then slash top using cross or tick-tack-toe pattern.
Bake bread for about 30 minutes or until crust is browned and firm. (I usually pick up my loaf and check out the bottom to make sure it's done and not doughy on the inside).
Refrigerate remaining dough until ready to use.
Monday, December 24, 2012
Sugar, Sugar (cookies)
One of my family traditions is cut out sugar cookies. We celebrate Christmas on Christmas Eve and one of the things we do together is decorate cookies together. This year I'm bringing the dough and we'll bake and frost at my parent's house. We've used the same recipe for years and they always turn out great! I thought I would share:
1 cup butter, room temperature
1 1/2 cups sugar
3 eggs
1 tsp vanilla
3 1/2 cups flour
2 tsp baking powder
1 1/4 tsp salt
Directions:
Cream butter, sugar, eggs and vanilla together. Sift flour with the baking powder and salt and then slowly add to wet ingredients and mix well. Chill dough several hours/over night. Roll out (using flour) and cut out with cookie cutters. Place on baking sheet at bake at 375F for 6-8 minutes, depending on size. Watch edges as cookies easily brown. If the edges are browned, remove from oven.
Note, I used parchment paper to prevent sticking to the cookie sheet.
Once cookies cool, frost/decorate!
Glaze: I glazed the cookies in the photo with an easy glaze of powdered sugar, cream, vanilla and food coloring. I started with 2 cups powdered sugar and added 2 T cream and a splash of vanilla (1/4 teaspoon) to start, mixing well. I wanted a thick glaze that would stay on the cookie. Keep adding cream or powdered sugar until you get to the desired consistency. Once they were glazed, I let the cookies sit out overnight to harden.
Wednesday, November 28, 2012
Italian Sausage and Qunioa Stuffed Peppers
By Sunday night, C was ready for a change from the traditional Thanksgiving fare (we had two celebrations on Thanksgiving Day and another on Sunday + the left-overs his Mom sent) so he asked me for something different and these stuffed peppers fit the bill! They took a little longer to bake than we expected but turned out great! The process is easy and they could be made ahead of time and kept in the fridge and popped in the oven for an easy weeknight meal. C said they were even better for lunch the next day after the flavors had a chance to develop together.
Ingredients:
1 lb Italian Sausage
1 onion, diced
1 cup cooked qunioa (you know, because one of us is kind of Primal around here)
2 tbs tomato paste
4 large peppers (we used a pack of multi-colored ones)
1/2 cup shredded cheese (we used mozzarella)
Steps:
1. Preheat oven to 350.
2. In a skillet, saute sausage and onion until browned and cooked through. Drain on paper-towels to remove extra fat. While sausage is browning, clean peppers, removed seeds and white membranes from inside and cut off top for filling.
3. In a bowl, combine sausage/onion mixture with qunioa, tomato paste and most of cheese, reserving a little for the top of each pepper.
4. Spoon filling into peppers, until it reaches the top. Top with remaining cheese. Spray baking dish with cooking spray and place peppers in baking dish. Cover with foil and bake for 30-45 minutes or until peppers are tender. Remove foil to allow for cheese to brown for a few minutes. Remove from oven and serve!
This recipe could be adapted so many ways with any rice or grain in your pantry and ground meat in your freezer. Next time, I would like to add another veggie or two in the filling...any thoughts on what I should try?
Ingredients:
1 lb Italian Sausage
1 onion, diced
1 cup cooked qunioa (you know, because one of us is kind of Primal around here)
2 tbs tomato paste
4 large peppers (we used a pack of multi-colored ones)
1/2 cup shredded cheese (we used mozzarella)
Steps:
1. Preheat oven to 350.
2. In a skillet, saute sausage and onion until browned and cooked through. Drain on paper-towels to remove extra fat. While sausage is browning, clean peppers, removed seeds and white membranes from inside and cut off top for filling.
Filling mixture, combined! |
Peppers, Stuffed! |
Topped with Cheese, ready for the oven! C decided to try one with a slice of pepperjack, he liked it. |
Finished product! |
Tuesday, October 2, 2012
Apple Cider Waffles
One of my latest pregnancy cravings has been waffles! My waffle maker was under repair (thanks Chris for fixing it!) but now I'm back in business. I prefer to make waffles at home so I can control the nutritional content and I top with fruit and nut butter or syrup.
Adapted from: Stephanie Cooks
Ingredients:
3/4 cups whole wheat flour
1 cup white flour
1 tbsp brown sugar
1 tsp baking powder
1/2 tsp baking soda
1/4 tsp salt
1 tbsp brown sugar
1 tsp baking powder
1/2 tsp baking soda
1/4 tsp salt
1 tbs ground flax meal
1 tsp cinnamon
1 egg
1 tbsp vegetable oil
1/3 cup milk
1 cup apple cider
1 egg
1 tbsp vegetable oil
1/3 cup milk
1 cup apple cider
1/2 cup unsweetened applesauce
Directions:
1. In a mixing bowl combine the flours, sugar, baking powder, baking soda, salt, flax meal and cinnamon. Stir well.
2. Beat in the egg, oil, milk, and cider.
3. Set aside and let stand 5 minutes while heating your waffle iron.
4. Spray the waffle iron and cook according to waffle iron directions. Enjoy them hot or prep for the freezer!
5. Let extra waffles cool and divide into halves. Separate with wax paper and put into a freezer bag. Freeze to enjoy later (just pop them in the the toaster/toaster oven to reheat).
Waffles cooled, separated and in waxed paper |
Ready for the freezer! |
Wednesday, September 19, 2012
Apple Custard Pie with Brown Sugar and Cinnamon Crust
My new Saturday morning routine is hitting the gym for a strength training class at 8am, then Trader Joe's and the the North Union Farmers Market...all within walking distance of each other at Crocker Park. We love supporting local businesses and great food so shopping at the farmers market is a win-win. Fall produce is starting to arrive and I couldn't resist buying some Courtland apples and baking over the weekend. I don't make pie very often (1. two people do not need a whole pie and 2. I don't make pie crust enough to be really good at it), but when I asked Chris what he wanted me to make with the apples, "pie with vanilla ice cream" was his answer. I perused my cookbook collection and came up with this recipe from Janice Cole's Chicken and Egg cookbook: Brown Sugar-Apple Custard Pie (with a few adaptations, of course). I received this book from Brittany for my birthday one year and every recipe that I've tried has been delicious. Now, on to the pie!
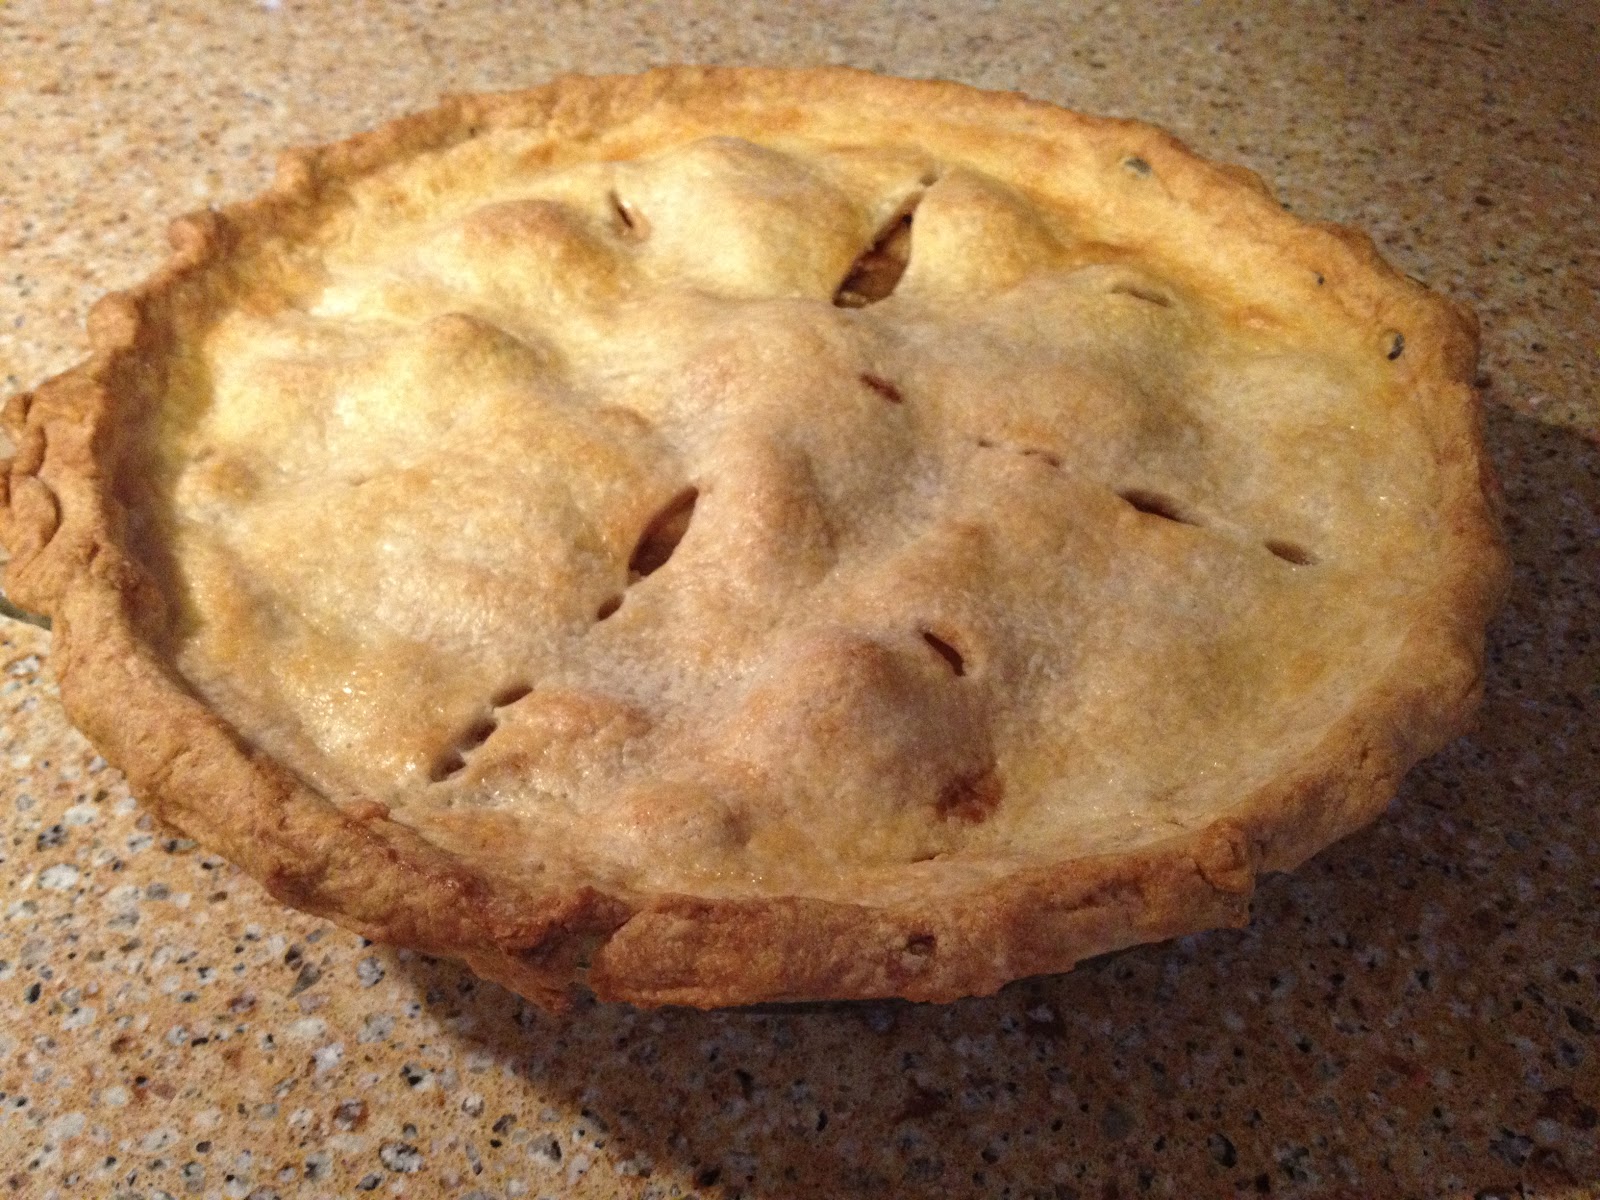
Cinnamon-Sugar Crust
2 cups all purpose flour
2 T packed light brown sugar
1/2 t cinnamon
dash of sea salt
3/4 cup cold unsalted butter, cut into pieces
3-6 T ice water
Pie Filling
6 cups baking apples, sliced and peeled-I used Cortland
1 T lemon or lime juice
2 T flour
3/4 cup packed brown sugar
1 t cinnamon
1/2 t nutmeg
dash of salt
Custard
1/2 cup heavy whipping cream
1 egg
Crust:
1. In the bowl of your electric mixer, mix flour, brown sugar, cinnamon and salt with the paddle attachment. Add the butter and beat until butter is in pea sized pieces. Add the water, a tablespoon at a time until dough sticks together.
2. Gather dough together and divide into two halves. Press into disks and wrap in plastic wrap and chill until firm. I stuck mine in the freezer for 20 minutes.
3. Preheat oven to 375.
4. Roll out dough disks on a lightly floured surface until it's a 12 inch round. Roll out second disk. Place one of the rounds in a 9 inch pie plate and press into place. Loosely place the other round on top and refrigerate until ready to use.
Filling:
1. Toss apples in a large bowl with lemon juice, flour, brown sugar, cinnamon, nutmeg and salt.
2. Pile into pie shell, mounding in the center.
Custard:
1. Whisk together egg and cream in a small bowl.
2. Pour, gently, over the apples.
Finishing the pie:
1. Place the 2nd 12 inch pie crust round over the top of the pie. Crimp the edges to seal. Cut vents in the top.
2. Lightly brush with egg wash or cream and dust with granulated sugar.
3. Cover edges with a pie shield or foil so they don't get too brown.
4. Bake pie for 25 minutes and then remove pie sheild/foil. Bake for an additional 25-30 minutes, or until apples are tender and crust is golden brown.
5. Cool before slicing.
6. Serve with ice cream (if you are like my husband) and enjoy!
View of the inside so you can see the custard filling |
Chris and I both enjoyed this pie. It reminded me of the Cream Cheese Apple Pie that I made last fall but a lot lighter. The custard is very light but a nice touch. The crust is lightly flavored with just a hit of cinnamon and sugar but it does give it something special.
Sunday, June 10, 2012
The Mig Sangira
Yesterday, I made The Mig Sangria (as in Amigo Drive, my dear friend Lea's house) for C's graduation celebration! Yes, we are now a 2 MBA household! I did a terrible job taking photos so once I get my hands on some, I'll post. Any-who, back to the sangria that Lea and I concocted on Amigo Drive while we were waiting for Chris to get home from Afghanistan (we also played drinking games with C's family but that's a story for another day!) It's a fun, fruity drink made with moscoto so it's very light and is perfect for summer! Here are a few photos of our fun-loving friend who we are so blessed to have in our lives!
The Mig Sangria
1 bottle moscoto wine or your favorite white wine (I buy a cheap and bubbly one, like Barefoot)
1/2 cup Triple Sec
1/2 cup Cran/Grape Juice or any other berry juice
1 cup Sprite or Seltzer water
2-3 cups mixed berries, cut into small pieces (strawberries, cherries, blueberries, raspberries)
Cut up berries and soak in Triple Sec over night in fridge. Chill remaining ingredients in fridge. Before ready to serve, combine all ingredients, stir and serve. Soooo easy! Enjoy!
What are some of your favorite summer cocktails?
A running update:
Sonya-the streak lives on!
Day 12-3 miles
Day 13-1 mile (graduation day, I barely had any time to run at all!)
Day 14-3 miles
Chris- not so much!
C decided that he wasn't enjoying all the running and has taken a hiatus. He has been spending lots of time on the golf course instead :)
![]() |
Caitlin, Lea, Missy, Sonya |
![]() |
Brian, Caitlin, Sonya, Lea |
![]() |
Alison, Sonya, Missy, Lea, Caitlin, Christie |
Sonya and Lea |
The Mig Sangria
1 bottle moscoto wine or your favorite white wine (I buy a cheap and bubbly one, like Barefoot)
1/2 cup Triple Sec
1/2 cup Cran/Grape Juice or any other berry juice
1 cup Sprite or Seltzer water
2-3 cups mixed berries, cut into small pieces (strawberries, cherries, blueberries, raspberries)
Cut up berries and soak in Triple Sec over night in fridge. Chill remaining ingredients in fridge. Before ready to serve, combine all ingredients, stir and serve. Soooo easy! Enjoy!
What are some of your favorite summer cocktails?
A running update:
Sonya-the streak lives on!
Day 12-3 miles
Day 13-1 mile (graduation day, I barely had any time to run at all!)
Day 14-3 miles
Chris- not so much!
C decided that he wasn't enjoying all the running and has taken a hiatus. He has been spending lots of time on the golf course instead :)
Friday, June 1, 2012
Easy breakfast smoothie
I realize it's been a while since I posted a recipe. I've been cooking I just haven't taken the time to share with you all. So here's one of my favorite quick and easy breakfasts, a peanut butter and banana smoothie.
1 banana, sliced and frozen (doesn't have to be frozen but it makes for a really creamy smoothie, trust me)
1 cup fat free milk
1 tablespoon peanut butter (or your favorite nut butter)
1 teaspoon flax meal
Combine ingredients in blender and pulse until combined. If you aren't using frozen banana slices, toss in a few ice cubes.
Enjoy! it's also a great post-workout drink!
Subscribe to:
Posts (Atom)